
Harp
-
You can support future updates of this package

- Version
- Download 1
- File Size 0.61 KB
- File Count 1
- Create Date March 15, 2026
- Last Updated March 15, 2026
- Installation Support and Update requests /forums/topic/Harp

| File | |
|---|---|
| harp.yml |
Nextcloud AppAPI HaProxy Reversed Proxy
About:
HaRP is a reverse proxy system designed to simplify the deployment workflow for Nextcloud 32’s AppAPI.
It enables direct communication between clients and ExApps, bypassing the Nextcloud instance to improve performance and reduce the complexity traditionally associated with DockerSocketProxy setups.
HaRP provides a flexible and scalable solution for managing ExApps, supporting deployments both locally and on remote servers.
It can be installed alongside Nextcloud or on a separate host, allowing for optimized performance and security.
The system supports simultaneous HTTP and HTTPS communication, enabling trusted networks to use direct HTTP access while securing external or untrusted connections via HTTPS.
In addition, HaRP includes built-in brute-force protection and dynamic routing capabilities, making it well-suited for a wide range of network infrastructures, from simple home setups to large distributed environments.
What Does HaRP Do?
- Simplifies Deployment: Replaces more complex setups (such as DockerSocketProxy) with an easy-to-use container.
- Direct Communication: Routes requests directly to ExApps, bypassing the Nextcloud instance.
- Enhanced Security: Uses brute-force protection and basic authentication to secure all exposed interfaces.
- Flexible Frontends: Supports both HTTP and HTTPS for ExApps and Nextcloud control, and FRP (TCP) frontend.
- Multi-Docker Management: A single HaRP instance can manage multiple Docker engines.
- Automated TLS for FRP: Generates self-signed certificates for FRP communications (unless explicitly disabled).
In this tutorial, i will show you how to install Harp using Docker Manager on your TerraMaster NAS.
Download from above the harp.yml file and save it locally on your computer.
If you already have Docker Engine and Docker Manager apps installed, proceed to next step.
If not, follow this guide to install them: How to install Docker Engine and Docker Manager.
If you already have these 2 shared folders, proceed to next step.
If not, follow this guide to create the folders: How to create DockerYAML and DockerAppsData shared folders
Open Docker Manager by using the icon on the desktop or from the top menu.
Click on Project from the left menu and then on the small + icon to add new project.

- On the Project name type harp
- On the Project path type /Volume1/DockerYAML or use the Browse button to navigate and select the DockerAppsData folder
- Configuration file source select Your computer from the dropdown list
- Click on the folder icon to browse your local computer for the harp.yml file downloaded on Step 1.
After you select the file, click on Open.
The file will be loaded and the content will appear on the code section.
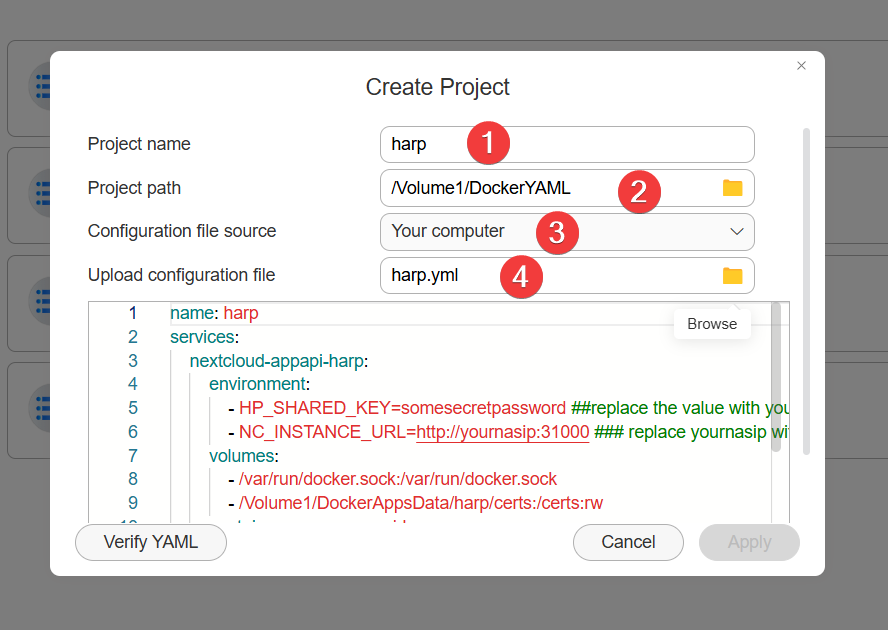
Before you proceed further, adapt the code to your particular values for these variables:
HP_SHARED_KEY- choose a secret password of at least 12 charactersNC_INSTANCE_URL- IP address and port where Nextcloud installation is running
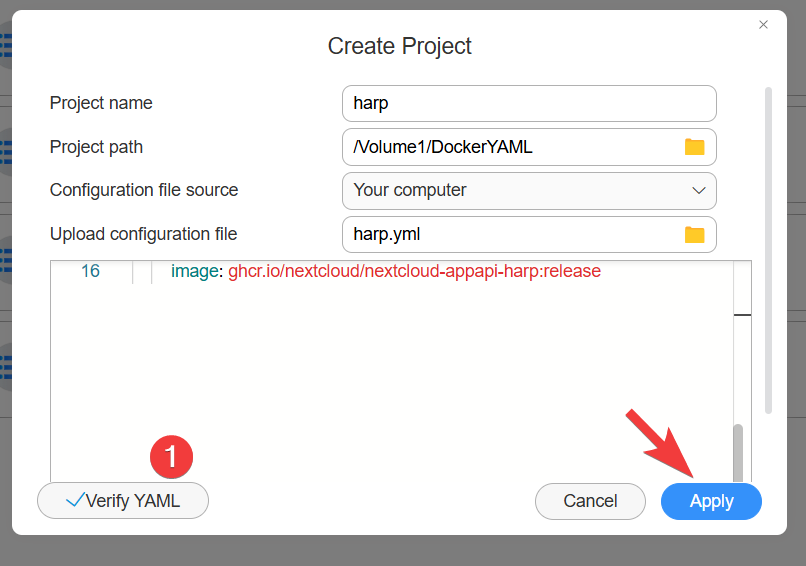
Config files will be stored at /Volume1/DockerAppsData/harp
Scroll down in the code window to review the config.
After you adapt all the required values, click on Verify YAML button. If the code is OK, the Apply button will become available.
Click on it to deploy the project.
The project will start building.
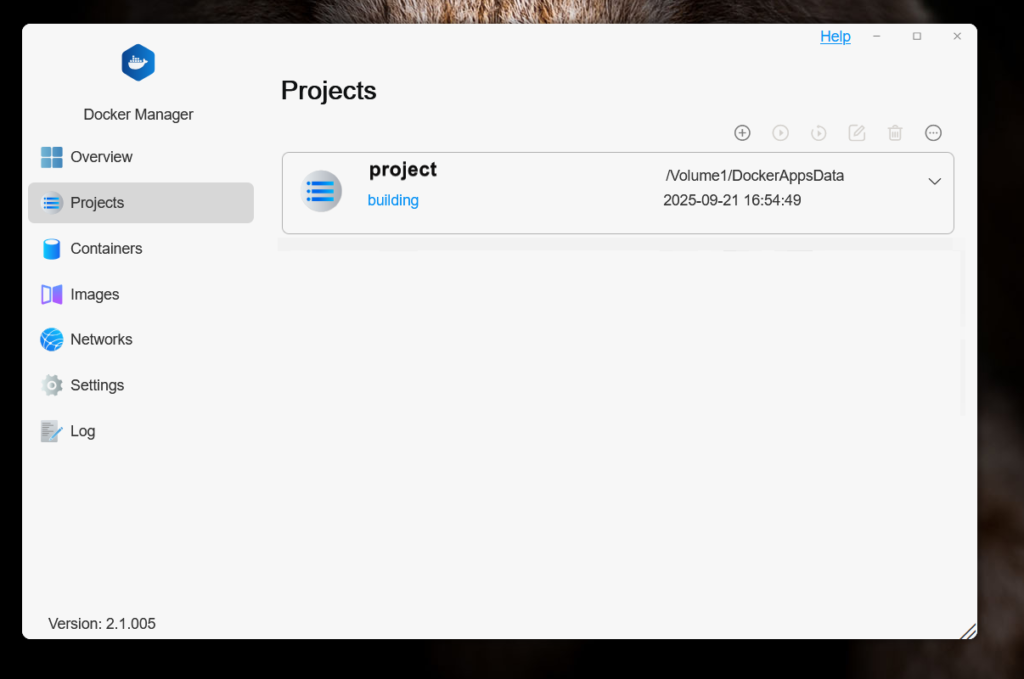
If the building went well, our project will show the status as Running.
When the project is selected, the buttons on top will be available from where you can stop/start the project, restart, delete or force stop.

You are now ready to continue in Nextcloud to setup the ExApi